The Critical Speed Map is normally displayed in a log-log graph of the undamped critical speeds vs. bearing stiffnesses. You can change the graph title, labels, number of modes, and many others by changing the default settings in the Setting dialog under Options menu. You can overlap your bearing stiffnesses under the Setting dialog to overlap the stiffness curve with the critical speed curve.
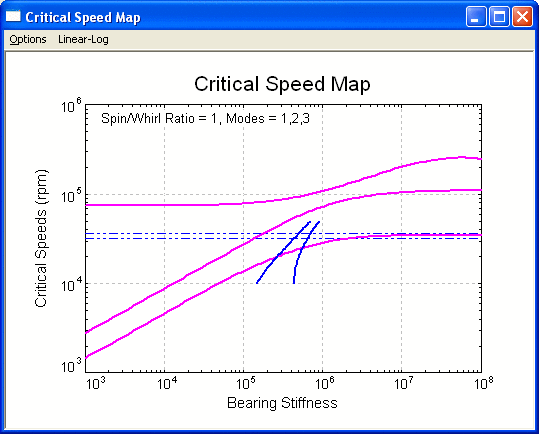
The above figure represents the critical speed map of a typical rotor in which the bearing stiffness varies from 1000 to 1.0E08 Lb/in. For stiffness range from 1.0E03 to 1.0E05 Lb/in, the first two modes are essentially straight lines on the log-log scale. These two frequencies in this stiffness range represent rigid body cylindrical and conical modes. The third mode is unaffected by this range of stiffness and represents the first free-free mode.
Note that above a stiffness of 1.0E07 Lb/in the first and second critical speeds do not increase with a further increase in stiffness. The bearings have become node points with zero displacement (rigid bearing). These are called rigid bearing critical speeds. Operation of the rotor in this stiffness range is dangerous since the bearings will provide no damping.
See also Lateral Vibration Analysis, Critical Speed Map Analysis.
Copyright © 2014-2017